How to set up multiple domain in one droplet or IP in Ubuntu server

Apache web server is one of the most powerful and flexible web servers and this the reason why it is highly popular. One of those features is to host multiple domains or sites on a single interface or IP by using matching mechanism. One cannot figure out that the same server is used for other domains also. Each configured domain then directs you to the specific directory which holds the site information.

Now, let’s go through the guide on how to set up multiple domains in one droplet or IP.

Process to set up multiple domains –

In your server, already there would a domain under /var/www/html directory. Now you want to add one more domain in that droplet. Let’s say the domain name is example.com

Now,

1. Make a directory for the new domain.

You have to make a directory in the server to hold the site data.

Open your Terminal and run the following code.

sudo mkdir -p /var/www/example.com/html

Go to /var/www  directory to check the newly created example.com folder.

2. Grant Permissions

sudo chown -R $USER:$USER /var/www/example.com/html

Also, modify the permission for the directory.

sudo chmod -R 755 /var/www/example.com

3. Create an index demo page

You can create a demo index.html page by using code or by directly uploading the index.html file in /var/www/example.com directory.

Now create a index.html file.

nano /var/www/example.com/html/index.html

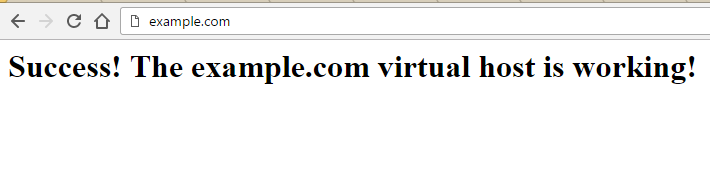
In this file, create a simple code as mentioned below –

<html>
  <head>
    <title>Welcome to example.com!</title>
  </head>
  <body>
    <h1>Success!  The example.com virtual host is working!</h1>
  </body>
</html>

Then save and close the file.

4. Create New Virtual Host Config Files

Copy paste the following code and create a Virtual host file

sudo cp /etc/apache2/sites-available/000-default.conf /etc/apache2/sites-available/example.com.conf

Now edit the file

sudo nano /etc/apache2/sites-available/example.com.conf

or directly go to /etc/apache2/sites-available to download and edit the file.

Paste the following code –

<VirtualHost *:80>
 ServerName example.com
 ServerAlias www.example.com
 #Redirect / http://www.example.com/
 ServerAdmin admin@example.com
 DocumentRoot /var/www/example.com/html

 ErrorLog ${APACHE_LOG_DIR}/error.log
 CustomLog ${APACHE_LOG_DIR}/access.log combined
</VirtualHost>

Save and close the file.

5. Enable the New Virtual Host Files

Now Enable the New Virtual Host Files.

sudo a2ensite example.com.conf

Check whether Apache is configured correctly or not by running the following code –

apachectl configtest

If Syntax OK restart the server by running the following code. If not then modify the error.

sudo service apache2 restart

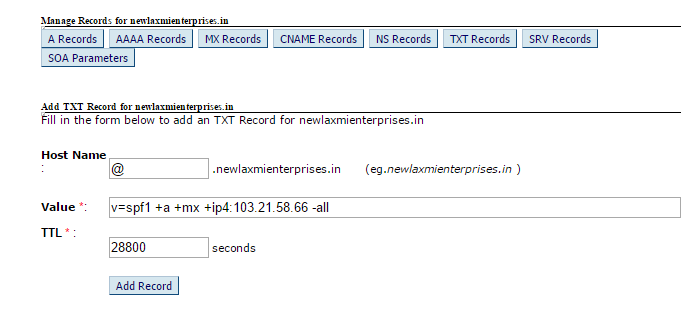
Now your new domain is ready. Point your server IP to your new domain IP.  It takes some time to point the IP. Hit the URL after some time and find your new domain mapped under the same server.

Contact me if you have any queries or if you require any professional assistance related to your web world, I’d be happy to help.

How to install SSL Certificate

I remember, a few days back we were working on one e-commerce startup. While talking about the required features, when I counted SSL, he gave me such a look as if I committed some crime. Well, let me tell you he is not alone. Many website owners don’t find SSL worthy to be integrated. Before I proceed on how to configure, let me tell you Why.

SSL Certificate

Why is SSL Certificate important?

The primary and important reason is to keep the sensitive information encrypted across the Internet encrypted to ensure that only the dedicated recipient can recognize it. This becomes important because the data that we send over the Internet passes from computer to computer to reach to the target server. During this journey, any computer between you and the target server can see your sensitive information like username, passwords, credit card numbers, and much more,  if it is not encrypted with an SSL certificate. On the contrary, when an SSL certificate is used, the sent information becomes indecipherable to everyone other than the designated server. This protects from hackers & identity thieves. Now you see why SSL Certificate is important.

How to install SSL Certificate?

1. Generate a CSR and Private Key

First of all, you have to create CSR & KEY on your server. For this open your terminal and copy paste the following code.

openssl req -newkey rsa:2048 -nodes -keyout yourdomainname.com.key -out yourdomainname.com.csr

To generate a CSR (yourdomainname.com.csr), and a private key  (yourdomainname.com.key), run the command (replace the yourdomainname.com with the name of your domain)

Now, fill up the required fields. If you don’t know the answers of the field, then leave those fields empty. Just make sure that the name in “Common Name” field matches the name you want to use your certificate with–Like – yourdomainname.com.

Example:-

Country Name (2 letter code) [AU]:IN
State or Province Name (full name) [Some-State]:West Bengal
Locality Name (eg, city) []:Kolkata
Organization Name (eg, company) [Internet Widgits Pty Ltd]:Your Company
Organizational Unit Name (eg, section) []:Web Security
Common Name (e.g. server FQDN or YOUR name) []:your_domain.com
Email Address []:your_email@domain.com

You can find the CSR and KEY in your server root directory.

2. Purchase Certificate and Upload CSR

Purchase a certificate from Namecheap or anywhere. Then open the Dashboard, upload the CSR file (which you created in the root directory) and activate the certificate.

3. Verify your domain

The certificate company provides you a txt file to verify your domain. Download the txt file and upload it to your /var/www/html directory.

4. Configure Apache to Use SSL

By this time, you would receive the certificate via email. Download the CRT and ca-bundle file and upload it to your server root directory, where you generated CSR and KEY.

Then proceed to /etc/apache2/sites-available and Download the 000-default.conf file.

Edit the following fields ONLY. Leave the remaining the way it is.

<VirtualHost *:80>
 ServerName www.your_domain.com
 Redirect / https://www.your_domain.com/
 
 DocumentRoot /var/www/html
</VirtualHost>
<VirtualHost *:443>
 ServerName www.your_domain.com
 
 DocumentRoot /var/www/html
 SSLEngine on
 SSLCertificateFile /root/your_domain.crt
 SSLCertificateKeyFile /root/your_domain.com.key
 SSLCertificateChainFile /root/your_domain.ca-bundle
 
</VirtualHost>

Then upload the file in this directory and check the Apache validity of the config files in the server. Put the code in terminal apachectl configtest and check whether apache config is ok or not. Make sure to resolve the error first, if any.

Then, enable the Apache SSL module by running this command:  sudo a2enmod ssl

Now, restart your server by running this command: reboot

Done. SSL is installed in your domain. You can check by visiting –  https://www.your_domain.com

If you have any queries, then feel free to write in the comment section or for any personalized support you can ping me at info@tcatechnology.com.

How to integrate mailgun in any framework

Many at times  when you send email using server via SMTP,  emails does not get delivered. Really, I was facing this issue when emails were not delivered to Yahoo server.  This is a very common problem and to solve this problem, Mailgun is one of the best tools. If you using mailgun, then you can track every email from their dashboard. Believe me, it is very user-friendly and highly useful. I can’t explain my feeling when I was able to penetrate into Yahoo server. I am sure if you are facing this problem, then surely Mailgun would give you a sigh of relief.

How to integrate Mailgun?

  1. First of all, you will have to check whether SMTP is installed on your server or not. If not then install SMTP.
  2. Then,  verify your domain in Mailgun dashboard. Next,  add your domain. You can find SPF record and DKIM record in the dashboard itself. Add these two in your domain account as a DNS TXT record. Click here to know  how to verify your domain.
  3. Now, download Mailgun library from this link and upload to your root directory.
  4. Copy the following code and paste it to your page.
$to = "anupam@tcatechnology.com"; //Where you want to send
$subject = "Enter email subject here.";
$message = '<table><tr><td>Test body</td></tr></table>
require 'PHPMailer-master/PHPMailerAutoload.php';
 
 $mail = new PHPMailer;
 
 $mail->isSMTP(); // Set mailer to use SMTP
 $mail->Host = 'smtp.mailgun.org'; // Specify main and backup SMTP servers
 $mail->SMTPAuth = true; // Enable SMTP authentication
 $mail->Username = 'ENTER YOUR MAILGUN SMTP USER NAME'; // SMTP username
 $mail->Password = 'ENTER YOUR MAILGUN SMTP PASSWORD'; // SMTP password
 $mail->SMTPSecure = 'tls'; // Enable encryption, only 'tls' is accepted
 
 $mail->From = 'info@yourdomainname.com';
 $mail->FromName = 'Your company name';
 $mail->addAddress($to); // Add a recipient
 $mail->isHTML(true); // For HTML mail format
 
 
 $mail->Subject = $subject;
 $mail->Body = $message;
 
 if(!$mail->send()) {
 
 echo 'Mailer Error: ' . $mail->ErrorInfo;
 } else {
 echo "Success";
 }

You are done. You can now check email log and complete details from this link.  Screenshot of one such data is presented below.

mail gun


That’s all for now. In the last few days, received many emails regarding configuring SSL Certificate. So, my next topic would be how to move your website to https. Subscribe to our mailing list to remain tuned and receive our update directly in your mailbox.

Bye and happy developing folks.


What is DKIM Key? How to generate it and add DKIM record?

What is DKIM record?

DKIM (DomainKeys Identified Mail)  is an email verification process designed to identify email spoofing by implementing a mechanism which allows receiving mail exchangers to check the incoming email from a domain which is authorized by the administrators of that domain. This mechanism prevents forged sender email addresses, a technique which is mostly used in email spam and phishing. DKIM permits the receiver to validate that the email which is claiming to come from a specific domain was actually authorized by the administrator of that domain.


STEPS TO GENERATE AND ADD DKIM RECORD


The first step is to generate D K I M record, which you can do from any of the following links   –

https://www.socketlabs.com/domainkey-dkim-generation-wizard/ 

OR  

http://dkimcore.org/tools/keys.html 


1. Procedure to follow for first link –  https://www.socketlabs.com/domainkey-dkim-generation-wizard/

i. Enter your domain name in domain section. After that enter a Selector (you can put any figure in this field). Then click on Generate button.

input to generate DKIM record

After that, you can check at the bottom, your D K I M key is ready.

dkim key


2. Procedure for http://dkimcore.org/tools/keys.html 

i. Enter your domain name and click on Generate button.

dkim selector and key

ii. Login to your domain panel.

iii. Select your domain.

iv. Go to “DNS management”.

dns management for spf

v. Then, select “text records” and click on “add txt records”.

text records

vi. You will see two fields over there –

                    a.  Host Name- Put the selector value there.

                    b. Value – Enter the key there.

Then click on Add record button.

dkim record add

How to add an SPF record for the domain name?

What is SPF record? –


SPF record is a DNS record (Domain Name Service) which recognizes the mail servers which are allowed to send emails on behalf of your domain. The objective of SPF record is to block spammers from sending emails using addresses of your domain.

Why is SPF Record important?


I am sure, you might have received the email of some poor John waiting only for you on Airport with a bag filled with 100 billion dollars. (I really feel bad for that guy).

Almost all spam emails come from a forged address which is quite easy for hackers to do. By misdirection, they can send out virus, spam, phishing emails. Such activities by hackers can slow down your server and email system as many reputable mail systems block the server which gives a resemblance of a spam sender (even remotely). So, here SPF comes into play.

SPF record is an anti-spam procedure to blocks spammer from spoofing your server’s address. It prevents spamming by protecting sender’s address and permitting the domain administrator to specify the servers which are permitted to send email from their domain. Now, let’s learn how to create an SPF record.

Steps to add SPF record

1. Login to your domain panel.

2. Select your domain.

3. Go to “DNS management”.

dns management for spf

4. Then, select “text records” and click on “add txt records”.

text records for spf

5. You will see two fields over there

i.  Host Name- You can put blank or @ in host name fields.

ii. Value – In value field, put v=spf1 +a +mx +ip4:***.***.***.*** -all

This value is for all server . Star shows your server IP. 

how to add SPF record

That’s all.  After adding, you can check the status from this link – http://www.kitterman.com/spf/validate.html

If you have any questions, then feel free to ask in the comment section.